Stroke a stroke in Photoshop
Sometimes you might want to add a stroke to a stroke on the same layer in Photoshop. Thankfully with a simple technique you can.
Making the stroke 
I’m going to use a custom shape here - a star. First open a new document 250 x 250px. Then select the Custom Shape Tool (shortcut U). In the top menu bar select the Star from the set that ships with Photoshop. Now draw a star on the canvas. Hold down shift to keep the proportions of the star and then space to position the star where you want it.
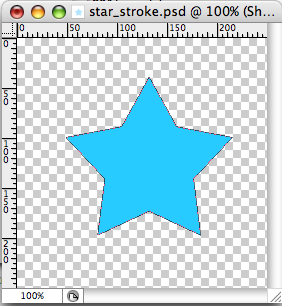
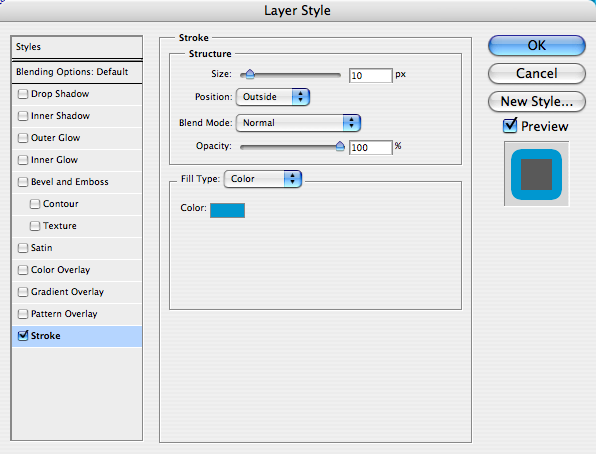
Now in the layers panel right click the layer you have just created and choose Blending Options. Add a stroke of 10px outside.
Your shape should now look like this.

Adding the second stroke 
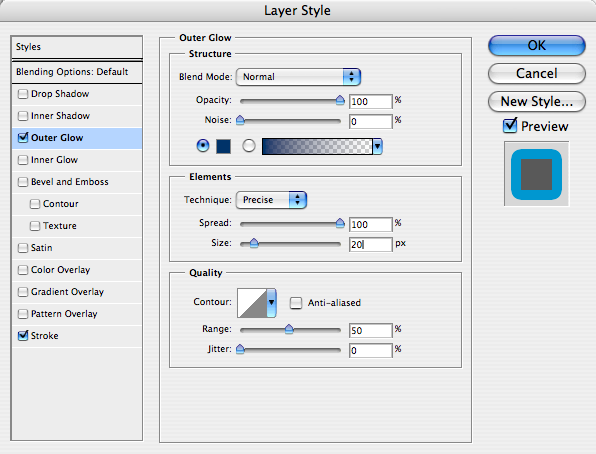
We can also use layer styles to add a second stroke. Here’s how to do it. Right click the layer again and choose blending options to get the layer style dialog again. This time select Outer Glow. By default the Blend Mode of Outer Glow is Screen. You need to change this to Normal. Move the Opacity up to 100%. Under Elements change the technique to Precise. Move the Spread to 100% and the Size to 20px. Remember that Photoshop draws this from the edge of the shape so if we want our second stroke to also be 10px we need to allow for the 10px of the first stroke.
That’s it - you now have a stroke on a stroke!

If you want to save this layer style for reuse simply open the style panel and then with your layer selected choose New Style. Give your style a suitable name and it will sit there ready to apply in the future.
Tags
Can you help make this article better? You can edit it here and send me a pull request.
See Also
-
Photoshop CS3 - Quick Selection Tool
If you are not already using the quick select tool you should give it a go - it can be far more efficient than the magic wand or magnetic lasso tools. -
Auto-blend photographs in Photoshop
If you have Photoshop CS3 you can automatically merge two different photographs to create a new one, with Photoshop doing all of the hard work for you. -
Creating backgrounds with Patterns in Photoshop
Often designs need a background to fill space behind navigation or other page elements. Here one way to create them.