Photoshop CS3 - Quick Selection Tool
If you are not already using the quick select tool you should give it a go - it can be far more efficient than the magic wand or magnetic lasso tools.
The quick select tool allows you to select areas of photographs more quickly than standard tools. Although it is not perfect it can give amazing results and save you time.
The task 
In this example we have a photograph from Flickr by steve.wild. We are going to assume that we want to change the colours of the doors. With the Quick Selection Tool it is simple.

The technique 
Select the Quick Selection Tool from the menu (shortcut W). In the top menu bar you will see that you can select your brush size. Depending on what you want to select choose an appropriate brush size. To make your selection just click and drag on the area you want. Generally the tool does a great job but you can refine the selection by adding (SHIFT) or subtracting (CTRL).
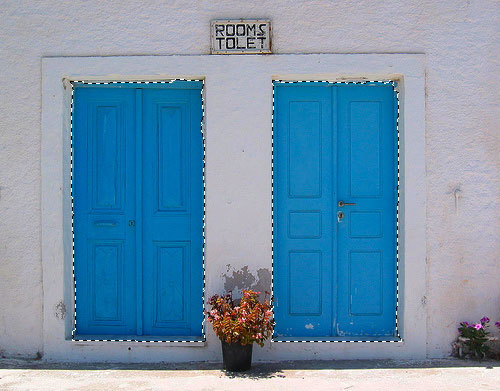
After using the Quick Selection Tool I’ve selected both doors in a matter of seconds.
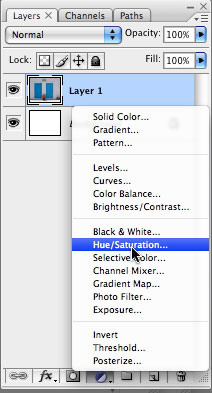
So I keep the original image I’m going to create a non-destructive adjustment layer. At the bottom of the layers panel click “Create New Fill or Adjustment Layer” and select Hue / Saturation… This brings up the Hue and Saturation dialog.
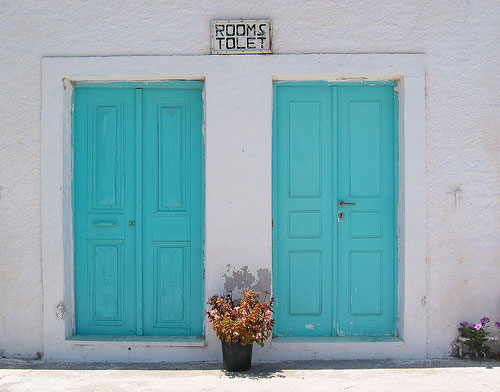
Then simply move the sliders until you get your desired color. Easy!
Here’s a video of the whole thing so you can see how quickly it can be done.
Of course you could also use the Color Replacement Tool but I like this way!
Tags
Can you help make this article better? You can edit it here and send me a pull request.
See Also
-
Photoshop 101 - Transparent Fills
Photoshop doesn't come with the same one-click ability as Illustrator to make the fill of shapes or objects transparent. Here's a workaround. -
Photoshop 101 - The Pen Tool
My favorite tool of all the pen tool allows you maximum control over drawing shapes and paths. It can be a little tricky to master at first but once you are up and running you won't look back. -
Photoshop 101 - The Type Tool
Adding type to designs is a daily task in Photoshop. Especially if you are interested in Typography mastering this tool is a must.