Photoshop 101 - The Move Tool
The second in a series on Photoshop Tools from a web perspective. The Move Tool is simple but has some advanced features that can save you serious time.
More than just moving elements 
The Move tool would seem to be one of the most simple tools available in Photoshop with just one option in the Tools menu. Basic use involves selecting the Move tool and then dragging things around the workspace. But the Move Tool boasts alignment and selection features that can save you time in creating designs for the web.
Basics: Moving things 
Tip: The shortcut key for the Move Tool is ‘V’. If you have the Photoshop window selected press V on the keyboard and this will select the Move Tool.
Moving elements on your page is simple. You have three options available to you:
- Dragging using the mouse Using the Marquee tool select an area of your image that you want to move. Then click, hold and drag your mouse. You will notice that when you move your selection the space behind where the image was becomes blank. If you are working with a layered image select the layer you want from the Layers Menu (F7) and then click hold and drag. Holding down the Shift key as you move limits the movement to straight lines or 45 degree angles.
- Nudging using keyboard arrows Make a selection using the Marquee tool. Then press M to select the move tool. Using the keyboard arrows and you will see the selection move. The arrows move the selection one pixel. If you want to move the selection 10 pixels hold down shift as you press the arrow keys
- Moving the workspace Hold the space bar and you will see the cursor turn to a hand (this is actually the Hand Tool). This allows you to move around the image much as you would using the slider bars at the bottom and right of the screen. To move simply click, hold and drag whilst you hold the space bar. If the image fills the screen then this will have no effect.
Quick copying 
The move tool allows you to quickly create a copy of your selection. With the Move tool selected hold Alt as you drag your selection. You will see that a copy is created for you.
Working with Layers 
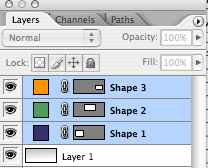
Working with designs for the web you will undoubtedly make heavy use of layers. The move tool and the associated alignment options make lining things up easy and can save you using grids or doing things by eye. First open a layered image. Bring up the Layers Menu by hitting F7.
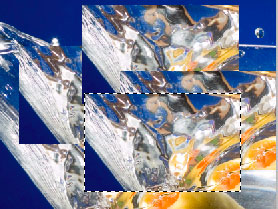
In this example we have three shapes.

In the layers menu select the layers you want to align. Holding Apple (CTRL on Windows) as you click allows you to multi-select. If you hold Shift as you select it will select everything between your first and last click.
With your layers selected you can use the alignment options associated with the Move Tool to lign up the layers however you like:

(Listed from left to right)
- Align top edges: Selected layers will be aligned to the top edge of the highest item. In our example it will be aligned with the top of the orange box
- Align vertical centres: Aligns selected layers to the vertical center of all elements
- Align bottom edge: Selected layers will be aligned to the bottom edge of the lowest element. In our example it will be aligned to with the bottom of the blue box
- Align left edges: Selected layers will be aligned with the left most edge. In our example this is the left hand side of the blue box
- Align horizontal centers: Aligns selected layers to the vertical centre of all elements
- Align right edges: Aligns selected layers to the right of all elements. In our example this will be the right edge of the orange box
- Distribute top edges: This will evenly distribute the layers using the top of the layers as a reference.
- Distribute vertical centers: This will evenly distribute the layers using the centre vertical centre of the layers as a reference.
- Distribute bottom edges: This will evenly distribute the layers using the bottom of the layers as a reference.
- Distribute left edges: This will evenly distribute the layers using the left edges of the layers as a reference.
- Distribute horizontal edges: This will evenly distribute the layers using the horizontal edges of the layers as a reference.
- Distribute right edges: This will evenly distribute the layers using the right edges as a reference
A example of where the layers have been been aligned with the top edges

Auto Selection 
There are two options in the options bar allowing you to auto select layers when you click on them
- Auto Select Layer: This automatically selects the layer you click on when the move tool is selected. It can be useful for files with a few layers.
- Auto Select Group: This automatically selects the Group of any layer that you click on.
Tip: With Auto Select Layer off you can still select your layer quickly by holding CTRL as you click. This will bring all layers associated with the Pixel you have clicked on. Simply select the layer you want to work with.
Transforming Selections 
The final option is Show Transform Controls. This is the same as hitting Apple + T (CTRL + T on Windows) and allows you to reshape your selection by dragging one of the 8 selection points.
Tags
Can you help make this article better? You can edit it here and send me a pull request.
See Also
-
Photoshop 101 - The Marquee Tool
The first in a new series on Photoshop Tools from a web perspective. The Marquee Tool is undoubtedly one of the most useful at your disposal and holds some unexpected capabilities. -
Creating Captioned Images in Photoshop
In creating a website branding is as important as any other discipline. One of the techniques I like to use to evoke brand messages is to use captioned images. Using a photoshop and a bit of knowledge of masks and opacity you can have a powerful brand motif in no time.