Photoshop 101 - The Marquee Tool
The first in a new series on Photoshop Tools from a web perspective. The Marquee Tool is undoubtedly one of the most useful at your disposal and holds some unexpected capabilities.
A Tool for Daily Use 
The Rectangular Marquee is one that you will use on a daily basis particularly for slicing up psds.
Tip: The shortcut key for the Marquee Tool is ‘M’. If you have the Photoshop window highlighted press M on the keyboard and this will select the Rectangular Marquee Tool.
Cutting out images and shapes 
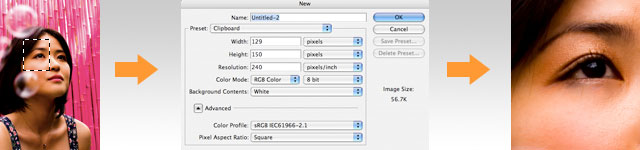
With the Rectangular Marquee Selected click, hold and drag the mouse over the part of the image that you want to turn into an image for use on the web. Then copy the selection using Apple + C (CTRL + C on Windows). If you are using a layered .psd then it is important that you remember to copy all layers rather than just the selected one. To do this hit Apple + Shift + C (CTRL + Shift + C on Windows). Then hit Apple + N (CTRL + N on Windows) to bring up a new document.
You will note it automatically selects the size of the image you have copied. Paste the image you have copied into the new window using Apple + V (CTRL + V on Windows). Finally save this image for the web. To bring up the Save for Web screen hit Apple + Alt + Shift + S (CTRL + Alt + Shift + S on Windows).
This is a task that I perform on a daily basis so learning the keyboard shortcuts can really save you time.
Returning to your original image you will note that your selection is still selected. To remove the selection hit the deselect shortcut: Apple + D (CTRL + D on Windows).
Getting a precise selection 
Tip: I recommend using the Info box when you are making selections. To get this up hit F8. As you drag you will be able to see the size of your selection.
The Marquee tool has a number of options to help you get the precise selection. If you need a freehand selection though I recommend using the Lasso Tool. Playing with these tools is much better than describing them so I suggest you open Photoshop and see them in action.
Tools 
- Rectangular marquee - this is the one I use most often. It is simply a rectangular selection box. Holding down Apple + Shift (CTRL + Shift on Windows) after you have clicked when you use it will keep the selection square.
- Eliptical marquee - this is a circular selection. Again Apple + Shift (CTRL + Shift on Windows) keeps the selection circular
- Single row / column marquees - I have never found much use for these but if you do want to use them you have to combine them with Add to Selection or Remove from Selection (see below).
Options 
In the menu bar at the top you will see a series of options:

- New selection - this means that each time you click and drag a new selection will be made
- Add to selection - this means that each time you click and drag your selection will be add to the existing on one the screen
- Subtract from selection - this means that each time you click and drag your selection will be removed from the existing one on the screen
- Intersect with selection - this means that each time you click and drag only areas that overlap with the existing selection will be selected.
- Feather - this means the edge of the image will be feathered - you can see the
effect before and after below. You can specify the width of the feather using
the box to the right. To feather an image select it then hit Apple + Alt + D
(CTRL + Alt + D on Windows)

An example of a feathred image - Anti-aliasing - you can turn this on to smooth edges
- Style: normal - this allows you to drag the Shape in any direction or size.
- Style: Fixed aspect ratio - this allows you to specify a ratio for the shape. For example 30 x 30 will mean the x and y parameters are the same.
- Style: Fixed size - this gives you a fixed select box and can be useful if you know the size you want.
Using the Marquee Tool with Free Transform 
A powerful use of the Marquee Tool is to combine it with the Free Transform. Lets say for example you have pasted your selection into a new image and you want to fill out the rest of it. You can use the Marquee tool to select an area of the image that you want to expand. Once you have selected it hit Apple + T (CTRL + T on Windows) and you will see it changes to a box. Drag the box so it appears as you want it to. Then hit return to confirm your selection. If you don’t like your selection hit escape.

Tags
Can you help make this article better? You can edit it here and send me a pull request.
See Also
-
Creating Captioned Images in Photoshop
In creating a website branding is as important as any other discipline. One of the techniques I like to use to evoke brand messages is to use captioned images. Using a photoshop and a bit of knowledge of masks and opacity you can have a powerful brand motif in no time.