Photoshop 101 - The Magic Wand Tool
Especially for high contrast images the Magic Wand tool makes selection simple. A tool for daily use this example shows how to remove a background quickly and easily.
Sample based selection 
A little like the Magnetic Lasso tool the Magic Wand does much of the hard work for you. It works by selecting pixels based on settings defined by you. Select the Magic Wand tool by pressing W.
In this example we are going to remove the background of a picture. This is a common task in Photoshop and one that is simple with the Magic Wand tool.
Settings 
The Magic Wand tool is primarily a selection tool so you will see the same options that you get in the Lasso and Marquee tools:

- New selection - this means that each time you click a new selection will be made
- Add to selection - this means that each time you click your selection will be added to the existing selection on one the screen. The shortcut for this is Shift.
- Subtract from selection - this means that each time you click your selection will be removed from the existing one on the screen. The shortcut for this is Alt.
- Intersect with selection - this means that each time you click only areas that overlap with the existing selection will be selected. The shortcut for this is Alt + Shift
There are a number of other options too:
- Tolerance - This determines how closely to match colours in the selection. This ranges from 0 to 255. 255 will select everything whilst 1 is very precise. The number you will need depends of the image but I find 60 is good for general work.
- Anti-aliased - This defines a smooth edge to the selection
- Contiguous - this selects only areas that are joined together.
- Use all layers - this allows the tool to select from all layers.
Knocking out the background 
Before starting you should copy the Background layer. This is a good idea so you can recover the image if anything goes wrong. Select your copied layer to begin working on it.
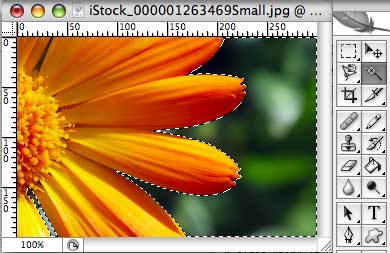
I’ve selected the Magic Wand tool using W and clicked into the background. You will see that at a tolerance of 60 it has selected some but not all of the background.

Tip: If you are not happy with your selection hit Apple + D (CTRL + D on Windows) to remove it and start again.
To select all the background I now use the add to selection option. Hold shift and you will see the icon change. Click in the areas that are not included until all of the background is selected.
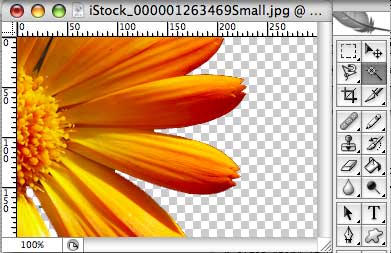
Once you have the background selected you can remove it or fill it as you wish. I’ve removed my selection by hitting CTRL + X
Tags
Can you help make this article better? You can edit it here and send me a pull request.
See Also
-
Photoshop 101 - The Lasso Tool
The Lasso Tool is another invaluable tool for making selections. For those with an unsteady hand or a hangover the Magnetic Lasso Tool will also save serious time in cutting out selections. -
Photoshop 101 - The Move Tool
The second in a series on Photoshop Tools from a web perspective. The Move Tool is simple but has some advanced features that can save you serious time. -
Photoshop 101 - The Marquee Tool
The first in a new series on Photoshop Tools from a web perspective. The Marquee Tool is undoubtedly one of the most useful at your disposal and holds some unexpected capabilities.