Saving time with Smart Objects in Photoshop
Smart Objects can save you a great deal of time if you are designing for the web in Photoshop. Furthermore they allow you to manipulate images without destroying the original.
What are Smart Objects? 
As of CS2 Web designers and photographers rejoiced with the introduction of Smart Objects in Photoshop. Smart Objects allow you to place objects on your page that can be repeated, edited in one place or even edited in other applications like Illustrator. Here’s an example. Let’s say we are designing a web page and we have created a simple search icon using Photoshop.
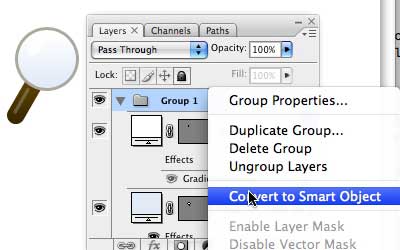
We are using this icon in the header to indicate a search but also further down the page to highlight a search feature. We could just copy and paste the layers that make up the icon here but it is much better to make it into a Smart Object (you’ll see why shortly). To do this move all of the layers for the icon into a new folder. If you don’t have the layers palette up go to Window > Layers or hit F7. Then create a new folder (at the bottom of the palette) and drag the layers into the new folder you have created. Now right click on the folder and choose Convert to Smart Object. You will see that the folder changes to a single layer with a new icon.
What’s happened here? The layers have been converted to an object. This means that they stay there underneath but that you can reuse the layer without affecting the layers underneath. You can now copy this Smart Object layer as many times as you like.
If you want to change the object you only have to do it in one place and every instance of the object will be updated. This is an idea that many programming languages have so if you know anything about Object Orientated Programming the idea is very similar.
Returning to our example we send the comp off to the client for approval and they love it. Great! But they have a few small changes. They don’t like the colour on the handle of search icon. Can it be a bit lighter? Of course you say.
The power of smart objects 
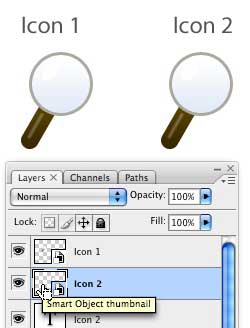
Here is where the power of Smart Objects is. In this case I have two instances of my search icon on the page. If I wasn’t using Smart Objects I would need to update both. But because I am using Smart Objects I only have to update this once. Imagine the time this could save you if you have 50 instances! To edit the Object in the Layers palette click on the Graphic on the layer. It doesn’t really matter which layer you choose - it will update both. When you click you will see a message from Photoshop to remember to save your edits. Don’t forget this or you will lose your amends.
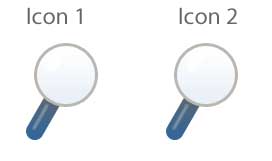
I can now see all of the original layers from my icon and I can go in and change the colour of the magnifying glass handle to a blue / grey gradient. I’m happy with my edits so I go to File > Save. This updates every instance of the icon in my document so both icons are updated. The comp goes back to the client in half the time.
Not just Photoshop 
If you prefer to do icon design in Illustrator you can also paste from Illustrator as a Smart Object. This allows you to repeat the Object as much as you like but if you want to edit it you return to Illustrator and do your editing there.
Good for photos too 
Smart Objects are also great for photographs in that you can apply filters without destroying the original photo. When you open your photo in Photoshop convert the photo layer to a Smart Object as before. You can then apply Filters to the Smart Object without destroying the original. You can even go back into the filter settings and change things.
Since learning about Smart Filters I have used them heavily to improve my workflow and to accomodate changes from clients more efficiently. If you don’t use them already I strongly suggest you do!
Tags
Can you help make this article better? You can edit it here and send me a pull request.
See Also
-
Make a photograph black and white in Photoshop CS3
Until recently I'd been using desaturate to convert photographs to black and white in Photoshop. In fact there is a much better non-destructive method. -
Designing with grids in Photoshop
Creating a grid to base your designs on is invaluable for giving structure to the page. Here's a quick introduction to grids and how you can speed up creating them in Photoshop. -
Creating backgrounds with Patterns in Photoshop
Often designs need a background to fill space behind navigation or other page elements. Here one way to create them.