Realistic highlights in Illustrator
A short tutorial on creating realistic highlights in Illustrator using clipping masks. The tutorial covers creating a path, adding a gradient and then creating a clipping mask.
An example 
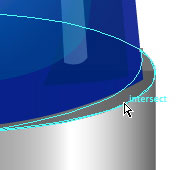
Here’s an icon of a police siren I created recently for one of my clients. When working on producing the highlights on the rim I found that using a clipping mask was the best way to get an good effect.

How to do it 
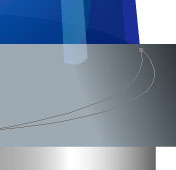
Looking at the rims of the silver bit of the light you first need to assess where your light source is coming from. Here it is coming from the upper left. So I need to have an effect that goes from light at the front to dark at the back. Using the pen tool and on a new layer I create the crescent shape that I’m going to use to show the highlight.

Adding a gradient 
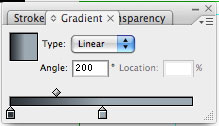
Next I add a gradient. I draw a large square over the area and then add a gradient in.

I want the light to go from right to left so using the gradient options I set the type to Linear and the Angle to 200. How you set it will depend on your light source and colours.

Make the clipping mask 
In order to make the clipping mask you need to group the path and the gradient. Select both layers (hold down shift to select both) and click CTRL + G on Windows or Apple + G on a Mac. This groups the layers together.
At the bottom of the layers palette is an option to make a clipping mask. With the group selected and ensuring the gradient is the bottom layer create a clipping mask. You can see the gradient is shown but only for the path you have drawn. If you are not happy with the gradient you can click the same button at the bottom of the layers palette, release the clipping mask and amend the gradient.

Using this technique you can get close to natural light effects. Of course there are other ways to do it but for now I like this one.

Tags
Can you help make this article better? You can edit it here and send me a pull request.
See Also
-
Illustrator 101 - The Twirl Tool
The twirl tool is a great tool that can make complex and eye-catching objects in no time. Here's one way to use it. -
Glossy badges in Illustrator
The star tool and opacity masks make it easy to make eye-catching glossy badges for websites and user interface designs. Here's an example of how to do it, including a downloadable Illustrator file to work with. -
Pattern Brushes in Illustrator Part Two
In part two of looking at Pattern Brushes in Ilustrator we look at how to expand brushes to add shapes to corners and the ends of paths.