Photoshop 101 - The History Brush Tool
The History Brush Tool allows you to paint and reveal previous states of images. This can be very useful in creating effects.
Revealing previous states of images 
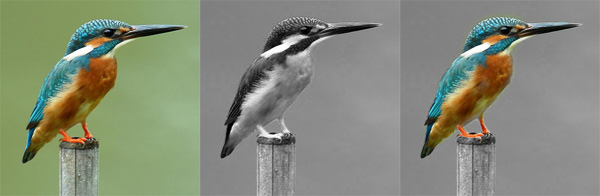
If you are familiar with the brush tool and layers this will be simple. I am going to artwork an image of a Kingfisher to bring out the colours of the feathers. The original image was taken by NatureatYourBackyard over on Flickr.
In this example I am going to turn the image black and white and then bring the kingfisher forward in colour. To turn the image black and white go to Image > Adjustments > Channel Mixer. In the bottom right hand corner there is a checkbox called Monochrome. Check this and the image will go black and white.
Open up the History pane by going to Window > History. You will see the last item should be Channel Mixer. Now we are going to use the History Brush Tool to bring the colour forward. Select the History Brush by hitting Y on the keyboard. In the history panel we need to define which History Item we will be using to paint with. Next to each history item is a small box. Click in the box and you will see the history brush icon appear. Now you can paint back what was in that layer.

In the example below you will see I have painted back in the colour for the Kingfisher. I started with a wide brush and used a fine point brush to finish the details and edges of the Kingfisher.
Tags
Can you help make this article better? You can edit it here and send me a pull request.
See Also
-
Photoshop 101 - The Clone Tool
The clone tool allows you to retouch images and remove blemishes. Understanding how it works will allow you to adapt images to your requirements. -
Photoshop 101 - The Brush Tool
The brush tool is one of Photoshop's most basic tools allowing you to draw freehand shapes and lines. The tool allows precision and correction abilities as well as some tricks using brushes. -
Photoshop 101 - The Healing Brush Tool
Primarily an artworking and retouching tool, the Healing Brush allows you to correct blemishes and errors and remove parts of your photos and images.