Photoshop 101 - The Eraser Tool
A common task in Photoshop is to remove pixels entirely from images. The Eraser tool offers a number of techniques to achieve this.
Removing sections of images 
Tip: The shortcut for the Eraser tool is E.
Often you will need to remove sections of an image or erase sections. Using the basic eraser tool this is simple. By selecting the Eraser tool and then drawing with it you can take sections of the image to transparency. If there is a background to the image you will erase back to the background.
If you are familiar with the Pencil and Brush Tools usage should be straightforward. You have three options available to you:
- Brush
- Pencil
- Block
The Brush and Pencil options are the same as using these tools. The only difference is that when you draw you are removing pixels rather than adding them. Block is what it suggests - a block!

Once you have selected the brush type you have two further options:
- Opacity - This is how transparent the pixels that you paint on the canvas are. If you set this to 0 you won’t be able to see your work at all. If it is at 100 then everything you draw on will be erased.
- Flow - This is similar to opacity but if you paint over the same area twice without releasing the mouse it has the effect of painting on top again. So if you set the Flow to 50 the first time you paint you erase pixels at 50%, but if you pass over it again it will entirely erased.
Finally there is the Erase to History checkbox. If you have altered the image in any way you will be able to see the history of the alterations by going to Window > History. This will bring up a list of actions. It works much in the same way as the History Brush Tool. As you paint the pixels from the previous state will be revealed. If you don’t have any history this option will not be available to you.
Commonly I use the basic eraser tool to remove mistakes or blemishes made on layers. With a quick swipe of the eraser tool it is gone.
Background Eraser Tool 
This tool knocks out the background from images. It works well where the background is distinct, but for me it is often a bit clumsy. It is useful for going to a transparent background. For cases where you want to smooth the background you may be better to use the Healing Brush Tool.
Magic Eraser Tool 
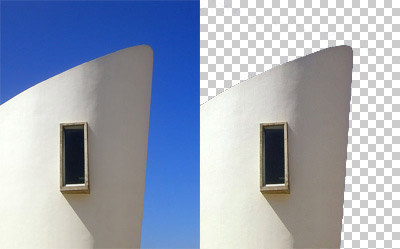
This works much like the Magic Wand Tool but instead of selecting sections of an image it removes them. Have a look at this photo by mipdesign on Flickr. On the left is the raw image. On the right I have selected the Magic Eraser tool. With one click the background is removed to transparency allowing me to replace it with something else.

Tags
Can you help make this article better? You can edit it here and send me a pull request.
See Also
-
Photoshop 101 - The History Brush Tool
The History Brush Tool allows you to paint and reveal previous states of images. This can be very useful in creating effects. -
Photoshop 101 - The Clone Tool
The clone tool allows you to retouch images and remove blemishes. Understanding how it works will allow you to adapt images to your requirements. -
Photoshop 101 - The Brush Tool
The brush tool is one of Photoshop's most basic tools allowing you to draw freehand shapes and lines. The tool allows precision and correction abilities as well as some tricks using brushes.