Illustrator 101 - The Pen Tool
A tool worth learning you can soon have the same control as you do when sketching. It is tricky to master but you can soon be up and running with a little practice.
Your bread and butter 
If you are going to use Illustrator for any length of time you will soon learn that the Pen tool will be one of your daily tools. It allows you to create objects and have a huge amount of control over what you draw.
The anatomy of a path 
Firstly the pen tool doesn’t draw lines, it draws paths. Paths are basically the same but are a vector based line. Select the pen tool by hitting P on the keyboard. To draw just a line make sure in the top right hand corner you select a stroke of 1pt and set the fill to transparent. Then click hold and drag on the canvas. You will notice at the point where you first clicked there is a white rectange. Either side of the rectangle are two blue lines with blue rectangles at each end. Release the mouse button and you will see something like this:
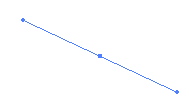
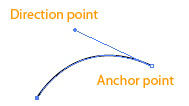
At this point you haven’t actually drawn anything. But if you click again you will see a line appear on the canvas. Illustrator calculates the curve of the path based on how much you dragged in the first instance. You will see the blue line still appears above your line. This shows how the curve was calculated. Later you can alter this line to change the curve if you like. This line is known as the direction point. The first click you made is now a white square. This is known as an anchor point.
Defining corners 
Drawing curves would be useful for curved shapes but at some point you will need to at a corner. If you hover over an anchor point you will see the icon turns to an inverted V. This will convert the anchor point to a corner. Click and the job is done.
Adding and removing anchor points 
As your drawings get more complicated you will need to return to paths you have drawn to add and remove anchor points. If you hold down the Pen icon in the tools menu you will see a flyout menu appear. You will see Add Anchor Point and Remove Anchor Point. These tools allow you to fine tune what you have done after your initial effort.
Fine tuning 
For me the best feature is the ability to move things around after I have drawn them. Select the direct selection tool and then click on a path you have drawn. You will see that all the anchor points and direction points become visible. Using this tool you can move things around. Hover over an anchor point and you will be able to click and move that anchor point around. You can also click and drag direction points around.
Creativetechs have produced a great cheat sheet for this tool. You can get a copy here.
An example 
In the video below I’ve drawn a face. But there are areas I am not happy with. So I am going to use the Direct Selection tool to fix a few things.
Illustrator 101 - The Pen Tool from George Ornbo on Vimeo.
Tags
Can you help make this article better? You can edit it here and send me a pull request.
See Also
-
Illustrator 101 - The Lasso Tool
The final selection tool this allows you to select using a freehand shape. Very useful for intricate drawings it can be much quicker than the other selection tools. -
Illustrator 101 - The Magic Wand Tool
No wizards just a solid tool that allows you to select objects based on defined criteria and make quick changes to your drawings and illustrations. -
Illustrator 101 - Selection tools
Understanding the selection tools is a must for working with icons or illustrations. Master the basics and you will save yourself a great deal of time.