Drawing symmetrical shapes in Illustrator
Drawing symmetrical shapes in illustrator can be a little bit tricky but once mastered it is a technique you can use over and over again.
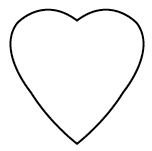
What we want to achieve 
In this example we are going to draw a heart shape. We will end up with something like this.
Once you understand how this works you will be able to use this technique to draw any symmetrical shape you want.
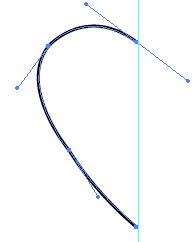
Drawing the shape 
First give yourself a ruler so you can see the middle of your shape or where the reflection will be. To get a ruler hit Apple + R (CTRL + R on Windows) and you will see ruler menus appear at the top and left of the screen. Hover your mouse over the left ruler and then click and drag to place a ruler on the canvas. Then using the pen tool draw your shape. You should end up with something looking like this:
Mirror the shape 
Next we want to mirror the shape. Make sure that your path is selected (use the selection tool if not - shortcut V). Then select the reflect tool (shortcut O). You will see a small blue target icon appear. This is the point at which the reflection will occur. We want the reflection to be on the line so click once on the blue line and the target will move. You should end up with something looking like this:
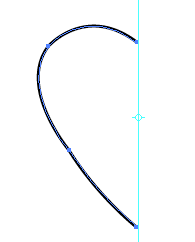
To make the reflection click hold and drag to the upper left of your path. As you drag hold down SHIFT to constrain the rotation and ALT to copy the shape. If the shape moves to the other side you have forgotten to hold ALT which will copy the shape creating a mirror.
Join the paths 
Now for the really tricky bit. Currently we have two separate paths. These are not much use if we want to fill the shape, copy it or use it as a symbol. So we need to join and average the paths together. Averaging means that two end points will be averaged before they are joined. This should make sense when you do this. There is a handy shortcut to join and average at the same time. To do this select the Direct Selection Tool. Select (shortcut A) the end point of your shape. When selected you will see the end point appear as a small blue rectangle. Hold shift and select the end point on the mirrored shape. You should see something like this:
Now hit Apple + SHIFT + ALT + J (Ctrl + Shift + Alt + J on Windows) to average and join the paths. A common mistake will be an error message saying “To join you must select two endpoints…”. This probably means that you have selected other anchor points rather than just the end points. Check there are no other anchor points with blue squares rather than white squares (blue means they are selected and will cause the error.)
If everything has gone to plan you now have a complete, joined path which you can fill, use as a symbol or pattern swatch.
Still stuck? 
Watch the whole process in the video below
Tags
Can you help make this article better? You can edit it here and send me a pull request.
See Also
-
Pattern Swatches in Illustrator
Pattern Swatches are a hidden gem in illustrator. You can use them to quickly fill shapes with patterns and illustrations. Here's a short tutorial using a t-shirt design. -
Using tessellation in CSS
Tessellation has been used for many years in wallpaper and other design environments where a large space of indeterminate size needs to be covered. Using CSS similar techniques can be used to deliver designs that look good and stretch to the width of the screen. -
Illustrator 101 - Line Tools
The line tools offer you flexibility to draw anything from straight lines to spirals. Hidden within the menu you will also find tools to draw rectangles and polar grids.