Curving The Edges of Images in Photoshop
I get a lot of search engine referrals from people looking to create curved images or curved rectangles in Photoshop. So here's a quick tutorial to show you how.
Curved rectangles 
Curved rectanges are simple - there is tool in photoshop that will create the shape for you. You can access this tool by pressing U. This selects the Custom Shape Tool. To create a curved rectangle you need the Rounded Rectangle Tool, which is the second one down.
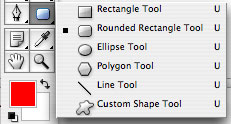
Then simply draw your rectangle. You change the amount of curve by altering the radius. In the default workspace this is at the top of your screen. If you don’t see your default workspace you can return to this by going to Window > Workspace > Default Workspace
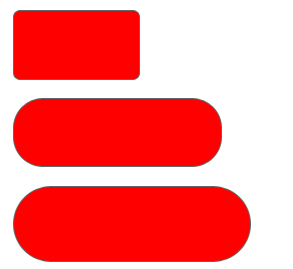
Examples of curved rectangles where the radius alters the curve
Curving the edges of shapes or photographs 
Often you will want to break up the hard edges of photographs of solid shapes like rectangles or photographs. By applying a mask you can do this easily.
When you open your photo the image will have one layer by default. This will be called “Background”. In order to create curved edges you will need to copy this layer. Right click on the layer and choose Duplicate layer. Then hide or delete the original Background layer. Hiding is probably preferable incase it all goes wrong!
Step one - Draw the Curve 
Selected the Rounded Rectangle as we did in the first example. Then draw a rectangle over your shape. You can change the curve you have on your rectangle using the radius option. Don’t worry about the colour - you won’t see this in the end.
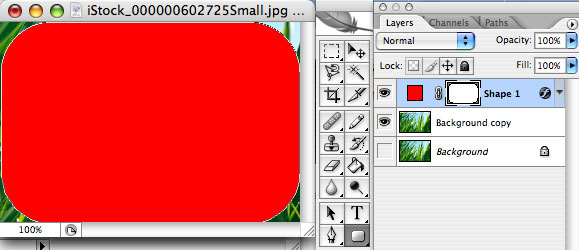
Step two - Select the Curved Rectangle 
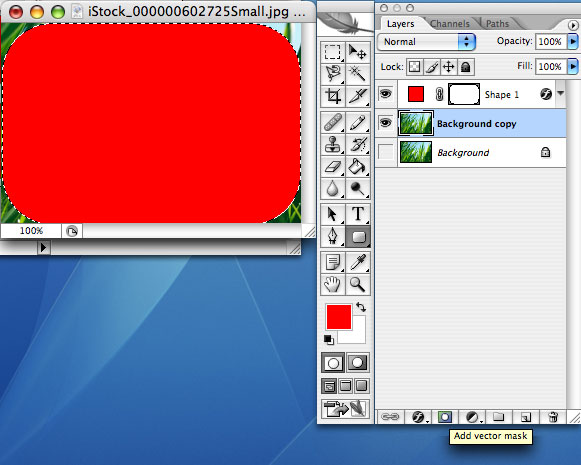
In order to create a mask you need to select the curved rectangle you have just drawn. To do this hover over the preview of the shape in the layers window. In the example this is the red square. Hold down the Apple Key on a Mac (CTRL on Windows) and you will see a white rectangle appear next to the hand. Click and the shape will be selected - you will note the familiar black and white edge to the shape showing it is selected.
Adding a vectorlayer mask 
To curve off the shape we use a vectorlayer mask. To create this you now select the Background copy layer. You should see that your curved rectangle is still selected. At the bottom of the layers pane is what looks like a small camera. As you hover over it is says “Add vectorlayer mask”. Click this to add the vectorlayer mask. When you add the mask you will see the parts of the picture that are not under the mask disappear.
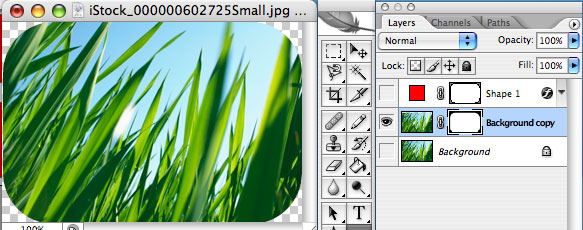
Showing the finished image 
To show the finished image simply turn off the visibility of your curved rectangle layer. You do this by clicking the eye icon in the layers window next to your curved rectangle layer. Then save out your image for the web and your are done!
Use your imagination 
You can use any shape to create a Vector mask so why not explore the elements within the Custom Shapes Tool? You can use any of them to mask off your photograph or shape.
Still don’t get it? Watch the movie! 
Curving the Edges of Images in Photoshop from George Ornbo on Vimeo.
Tags
Can you help make this article better? You can edit it here and send me a pull request.
See Also
-
Why use Web Safe Colours?
I've always designed using the web safe colour palette. Recently I realised I didn't actually know why. After a bit of research it would seem it is less relevant than I thought. -
Photoshop 101 - The Lasso Tool
The Lasso Tool is another invaluable tool for making selections. For those with an unsteady hand or a hangover the Magnetic Lasso Tool will also save serious time in cutting out selections. -
Photoshop 101 - The Move Tool
The second in a series on Photoshop Tools from a web perspective. The Move Tool is simple but has some advanced features that can save you serious time.