Batch resizing in Photoshop
If you have lots of images you want to resize Photoshop can take care of it for you. Using Actions and Automate you can do it once then put your feet up. Here's how it works.
The scenario 
Let’s say for example we have taken some photos for a client and processed them into .tif images. We want to send the client a quick proof, but the images are over 20MB, so too big to send over email. We need to reduce the size of the images. Let’s get started by opening one of the larger images.
Record the action 
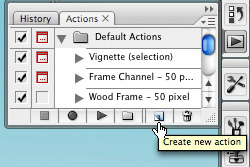
With one of our images open we head to the Actions palette. You can get to this via Window > Actions. We want to create a new action. Give your action a name and then hit ok. You will see the red record button is now on, meaning that anything you do in Photoshop now will be recorded.
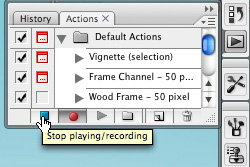
Resize the image by heading to Image > Image Size. I’m resizing my image to a width of 600 pixels wide. Then Save the Image for the Web by going to File > Save for Web and Devices. Choose a different folder to save the optimised file into than your originals. When saved close the original image and then click Stop on your action.
Automate it 
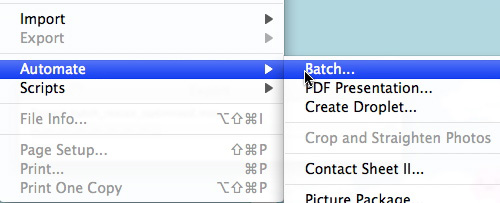
Now you have your action we can use it to automate an entire folder of image. To do this go to File > Automate > Batch.
On the options you want to select your Action under Play - Action (pick the one you have just created). Then under Source choose Folder and then select your Source folder. Then you should be all set. Click OK and it will start to run through each of the images in your folder! Magic.
Watch the video 
If you feel you’ve missed something watch the video. If you’d like the HD version you’ll have to watch it on Vimeo.
Batch resizing in Photoshop from George Ornbo on Vimeo.
Tags
Can you help make this article better? You can edit it here and send me a pull request.
See Also
-
Screen Modes in Photoshop
When designing in Photoshop there are a couple of options that allow you to review your design without noise around it. Here's a quick overview of how you can take a step back from the digital canvas. -
Saving time with Smart Objects in Photoshop
Smart Objects can save you a great deal of time if you are designing for the web in Photoshop. Furthermore they allow you to manipulate images without destroying the original. -
Make a photograph black and white in Photoshop CS3
Until recently I'd been using desaturate to convert photographs to black and white in Photoshop. In fact there is a much better non-destructive method.