Improving image quality in Photoshop
Often clients deliver images that are not really good enough for use on the web. Photoshop comes with some less well known features that can improve image quality drastically in a couple of clicks.
A word of warning 
Before you start working on your image remember you should never modify original images. Always either work on a copy or copy the image to a new layer and keep it locked. You can guarantee that at some stage you will make a mistake. If you have the original image or a locked layer you can easily start again.
A design responsibility 
Images are often a responsibility that is overlooked by the design team. Image quality has many meanings but here we mean that the image is crisp and that contrast, levels and colours are as good as they can be. Often the brightness or contrast means that the image is unusable. In a few cases the image cannot be improved but in most if not all there is a simple trick in Photoshop to rectify problem.
Auto correction 
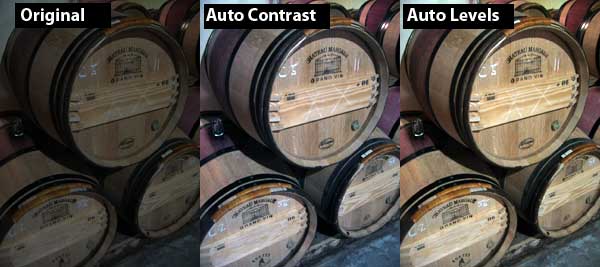
Photoshop comes with a number of Auto correction features that can fix most common problems. Unless I am 100% happy with images I run most images through these to see if they can be improved. Open an image in Photoshop and then go to Image > Adjustments. You will see three Auto correction options:
Auto levels
The Auto Levels command automatically adjusts the black point and white point in an image. Basically this increases the contrast of the image in proportion to the colour channels in the picture.
Auto contrast
This automatically adjusts the contrast without looking at the colour channels
Auto color
This searches the images and corrects common colour issues. It identifies shadows midtones and highlights, neutralising midtones and cliping shadows and highlights. It can have the effect of washing an image out but generally it does a good job
You can see in the following example that good results can be achieved using these tools.
Fine tuning 
The Auto-correction tools also allow you to fine tune what they have done. Once you have completed the auto-correction you can add an adjustment layer. Go to Layer > New Adjustment Layer. You can choose to target many different aspects of the image. Which one(s) you choose to use will depend on the image has come out.
Many other options 
Photoshop offers you hundereds of ways to improve the quality of images. Unless I’m doing some artworking I normally find that the Auto correction tools and a few adjustment layers will do the trick. If not you can explore the many options available under Image > Adjustments. The options are too many to list here but they are worth exploring!
Tags
Can you help make this article better? You can edit it here and send me a pull request.
See Also
-
Creating grunge effects in Photoshop
Designing with grids is commonplace in design but the danger is that everything looks a bit ordered. Using grunge effects you can keep your grid and mess up your hair to look a bit cooler. -
Concentric text in Photoshop
One day you might just be insane enough to want to write concentric text in Photoshop. It is quite illegible and likely to give you a headache but if you still want to do it read on. -
Creating custom shapes in Photoshop
A less well known feature of Photoshop is that you can create custom vector shapes and use them throughout your designs. Here's an of examples of how to do it.