Build your own Vim statusline
Statuslines in Vim are not hard to create. Making your own means one less dependency in your life.
What is a statusline in Vim? 
The statusline in Vim is the bar along the bottom of the Vim window. By default it does not show when you open Vim until there is more than one window. The statusline is intended to give you information about the status of a buffer with the default statusline including the path, permissions, line and a percentage representation of where you are in the file. For many people the default behaviour of vim is enough and you can get on with your life without having to configure anything.
Showing the statusline 
The statusline can be shown regardless of whether you have more than one buffer
open with the following setting in your .vimrc.
set laststatus=2
Similarly it may be disabled entirely if you never want to see it.
set laststatus=0
Hello World statusline 
A very basic statusline can be achieved by adding the following to the .vimrc
file.
First ensure that the status bar is enabled all the time.
set laststatus=2
Then set the statusline
set statusline=helloworld
Reload Vim and a not so useful hello world status bar will show.

Building a statusline 
A useful pattern to use when building a statusline is to concatenate the line
and build the statusline over multiple lines in your vimrc
set statusline=
set statusline+=hello
set statusline+=world
This makes the statusline easier to read when building and maintaining it.
Vimscript functions 
Statuslines can use Vim functions and it is possible to show anything that can be programmed in Vimscript in the statusline. This might be the weather, the price of ETH or more commonly the git branch that you are on. The following returns the current branch and an empty string if there is no git repository.
function! GitBranch()
  return system("git rev-parse --abbrev-ref HEAD 2>/dev/null | tr -d '\n'")
endfunction

function! StatuslineGit()
  let l:branchname = GitBranch()
  return strlen(l:branchname) > 0?'  '.l:branchname.' ':''
endfunction
This function can then be used in a statusline.
set statusline=
set statusline+=%{StatuslineGit()}

Showing data 
Vim has a number of variables that may be used in status lines. The f
character for example shows the path to the file in the buffer and the vim
documentation outlines clearly the data that can be shown.
set statusline=
set statusline+=\ %f
Colour 
Colour is perhaps the hardest part to configure in statuslines. The
documentation is harder to decipher here but offers the highlight colour
names that may be used to change the colour of the statusline. These colors are
named highlights and will vary with your colorscheme, you can preview all
highlight groups with :so $VIMRUNTIME/syntax/hitest.vim. The syntax for using
these color groups is as follows:
set statusline=
set statusline+=%#LineNr#
set statusline+=\ %f
A few lines over a plugin 
After reading the documentation and understanding how statuslines work it was easy to construct a statusline that works for me.
function! GitBranch()
return system("git rev-parse --abbrev-ref HEAD 2>/dev/null | tr -d '\n'")
endfunction
function! StatuslineGit()
let l:branchname = GitBranch()
return strlen(l:branchname) > 0?' '.l:branchname.' ':''
endfunction
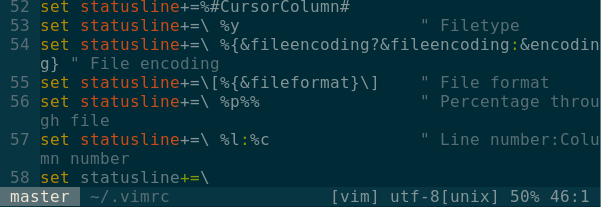
set statusline=
set statusline+=%#PmenuSel#
set statusline+=%{StatuslineGit()}
set statusline+=%#LineNr#
set statusline+=\ %f
set statusline+=%m\
set statusline+=%=
set statusline+=%#CursorColumn#
set statusline+=\ %y
set statusline+=\ %{&fileencoding?&fileencoding:&encoding}
set statusline+=\[%{&fileformat}\]
set statusline+=\ %p%%
set statusline+=\ %l:%c
set statusline+=\
Neovim 
The Neovim community has a number of plugins written in Lua.
You can also create your own status line in Lua. Here is the same custom status line ported from Vimscript to Lua.
local function git_branch()
    local branch = vim.fn.system("git rev-parse --abbrev-ref HEAD 2>/dev/null | tr -d '\n'")
    if string.len(branch) > 0 then
        return branch
    else
        return ":"
    end
end

local function statusline()
    local set_color_1 = "%#PmenuSel#"
    local branch = git_branch()
    local set_color_2 = "%#LineNr#"
    local file_name = " %f"
    local modified = "%m"
    local align_right = "%="
    local fileencoding = " %{&fileencoding?&fileencoding:&encoding}"
    local fileformat = " [%{&fileformat}]"
    local filetype = " %y"
    local percentage = " %p%%"
    local linecol = " %l:%c"

    return string.format(
        "%s %s %s%s%s%s%s%s%s%s%s",
        set_color_1,
        branch,
        set_color_2,
        file_name,
        modified,
        align_right,
        filetype,
        fileencoding,
        fileformat,
        percentage,
        linecol
    )
end

vim.opt.statusline = statusline()
Of course it may be easier for you to use powerline, airline or lualine. Personally 22 lines of code is enough to have a working statusline and I have one fewer dependency.
References 
- How to control/configure vim colors
- Learn Vimscript The Hard Way - Status Lines
- Powerline for Vim
- Airline for Vim
- Vim statusline documentation
Tags
Can you help make this article better? You can edit it here and send me a pull request.
See Also
-
Custom Vim Bindings in tmux 2.4
tmux 2.4 made a significant change to key bindings. Here is how to support custom keybindings for versions before and after tmux 2.4 -
Using template files in Vim
Vim templates or skeletons, allow you to specify a template to be used for new files with a certain extension. -
Vim eighteen months on
I switched to Vim for editing text about 18 months ago. Here's an overview of my experience.