Photoshop 101 - Burn, Dodge and Sponge Tools
More art-working tools that come straight from the darkroom to Photoshop. You can use these to fine tune your images and correct malformed exposure.
Straight from the darkroom 
These tools come straight from the darkroom floor where the development process could be tweaked using techniques to change the exposure to the surface of the photographic paper. Before we look at the tools lets examine the darkroom techniques to get an idea.
- Dodge - This is where light is blocked out to make portions of the image lighter.
- Burn - This is where light is allowed through specific holes to expose the paper to more light making it darker.
Understanding that more light means darker and less lighter is just how the tools work. Let’s start with the dodge tool.
The shortcut for all of these tools is O
Dodge tool - Making selected areas lighter 
The Dodge tool is really a post production tool. If you aren’t happy with how the exposure turned out on your photo you can use the Dodge Tool to increase it. Select your brush and you then have three options: shadows, midtones and highlights. The tool will target the tone that you choose. Finally set your exposure. This controls how intense the effect is.
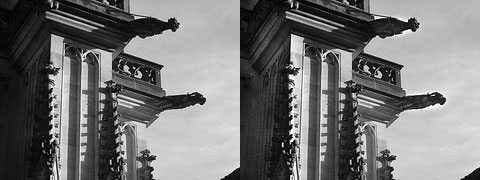
Using the Dodge tool you can easily increase the exposure of photos. In the following example the left edge of the picture has been lightened using the Dodge tool. The range was set to midtones and the exposure at 50%. The effect is slight but compensates for the overexposure of the left hand side.

The Burn Tool - the same in reverse 
The Burn Tool is really the inverse of the Dodge Tool. Instead of compensating for overexposure it allows you to darken areas that have been underexposed.
Sponge Tool - Adjusting Saturation 
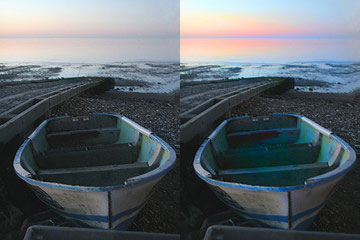
When you adjust saturation you adjust the strength of a colour. With the sponge tool you paint with a brush to either increase the saturation of decrease it. In the following example we have a beautiful photo by Barbara Rich. Using the sponge tool we are going to bring out the colours a little more by saturating them. Specifically the boat and the sky have been “sponged” to saturate the colours in these areas. Conversely if you wish to tone down colours select desaturate.

Tags
Can you help make this article better? You can edit it here and send me a pull request.
See Also
-
Photoshop 101 - The Blur Tool
The Blur Sharpen and Smudge tools are artworking tools that can give photos a different perspective. Also useful for graphical work they are well worth learning. Here's a short overview and a video showing how to use them. -
Photoshop 101 - The Gradient Tool
The Gradient and Paint Bucket tools are both useful gems in Photoshop and can be used to quickly fill in areas as well as create backgrounds for websites. -
Photoshop 101 - The Eraser Tool
A common task in Photoshop is to remove pixels entirely from images. The Eraser tool offers a number of techniques to achieve this.