Overlapping tabbed navigation in CSS
A tutorial showing how overlapping tabbed navigation is possible in CSS and can be cross-browser compatible, accessible and javascript free.
Not interested in the explanation? You can find the demo and download the source code here.

Overlaps - a problem 
Overlapping navigation is a real problem in CSS with the box model and browser support. It is possible though. This technique is advanced CSS and the tutorial assumes a good level of understanding of both CSS and XTHML.
Avoid it if possible 
If you can avoid it you should. It will be time consuming to produce and difficult to maintain. If you really need it or are just keen to see it done in CSS read on!
Step 1 - Graphics 
Before you even touch a line of code you will need to make graphics for your tabs. This requires some artwork to make sure that the tabs look realistic and have shadows for the on and off effects. Use Photoshop or Illustrator to design the tabs and organise your layers so you can quickly show and hide the different states. This method is image based so you can use any font you like. Image replacement is used so search engines and screenreaders will see text. Design an on, off and overlap state for each behaviour your want to see. Once this is complete and ready in a layered Photoshop or Illustrator file you are ready for the next step.
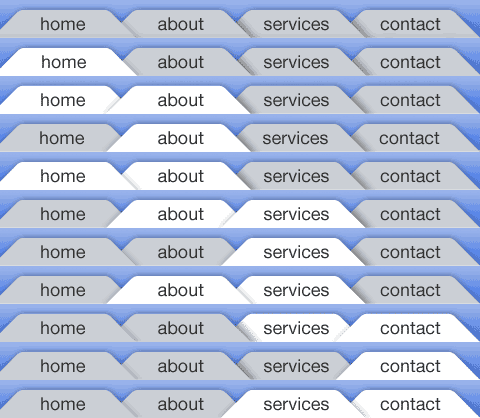
Step 2 - Saving the image 
To combat cross browser and image flicker problems this method uses one image as a background which is positioned using CSS. Depending on how intricate your design is this can make your image quite large. You will need to make a decision on how many states you have as the more you have the larger your image will be. You need to make an image with a line for each state. Once you have saved the image keep it open and use guides to find out the pixels dimensions for your CSS. Here’s the image I’m using. After playing with image optimisations I went for a png which works out at 12k.
Step 3 - The Markup 
The XHTML is the classic unordered list navigation. This means it will be good for search engines and good for screen readers. This method makes use of an id on the body tag to define the on state so you will need to either hard code the body id on the pages or handle this with some server side code. Each li item also needs a unique id so the background can be positioned correctly.
<html>
  <body id="home-page">
    <div id="nav">
      <ul>
        <li id="home"><a href="#">Home</a></li>
        <li id="about"><a href="about/index.html">About</a></li>
        <li id="services"><a href="services/index.html">Services</a></li>
        <li id="contact"><a href="contact/index.html">Contact</a></li>
      </ul>
    </div>
  </body>
</html>
Step 4 - Positioning the navigation 
Using the background-position property we position the image correctly for each list item. You need to be pixel perfect on this so this is where the guides or rulers and the marquee tool in Photoshop or Illustrator come in. You can measure the dimensions exactly and transfer it to the CSS. For the on states we position the tabs with a negative margin.
li#home a:link,
li#home a:visited {
  background-position: -0px -0px;
}
body#home-page li#home a:link,
body#home-page li#home a:visited {
  background-position: -1px -38px;
}
Step 5 - Fixing IE6 & Below 
IE6 and below have problems with interpreting negative margins on floated elements. To fix this we make the states where we need a hover absolutely positioned, and then apply a negative positioning. To make sure it shows on top z-index is used. This method works for IE5, 5.5 and 6. To keep things clean we put things in a sepearate stylesheet and serve this to older version of Internet Explorer using conditional comments. This also makes sure that IE7 gets served code that takes account improved CSS support.
body#about-page li#home a:hover,
body#about-page li#home a:focus {
  position: absolute;
  margin-left: -134px;
  width: 150px;
  z-index: 1;
}
Demo 
You can see the code in action in the demo.
The source code is also available for download. This code has been tested and works in the following browsers
- Win IE5-7
- Win Firefox 1.5-2
- Win Opera 9
- Win Netscape 8.2 (IE Engine)
- Mac Safari 2
- Mac Firefox 1.5-2
- Mac Camino 1
- Mac Opera 9
The best way to understand this will be by downloading the code and going through this yourself. The code is made freely available under a Creative Commons 2.0 license. The code is provided as is and no support is implied or given.
Tags
Can you help make this article better? You can edit it here and send me a pull request.
See Also
-
Firebug is simply brilliant
Software comes and goes and rarely is there a piece of 'must have' software. Firebug, an extension for Firefox, deserves to be to be heralded as an outstanding piece of software and something no web developer should be without. -
10 Steps to Better CSS
Coding CSS can quickly get out of control. By following a few simple guidelines you can make your life a lot easier. -
Using background images with links
Associating icons with links can in my opinion be a powerful design device. With a small amount of CSS it is simple to add icons into your links.